
I originally wrote this for road-trip traveling, but I guess it applies to any kinds of traveling, i.e. even when you don’t travel by driving your own/rented car yourself. Well, many people think that navigating through a road trip is easy considering the technology we have nowadays. We can set the destinations using GPS or just going online using Google Maps. But what if you don’t have GPS? What if there is no internet connection somewhere on your ways? Of course, you don’t want it to ruin your road trip, so navigating your ways when planning it is a must, especially when you have only a little time for a break. Here are what you can do.
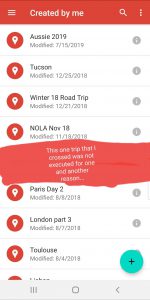
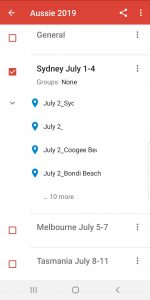
1. Create a map using Google Map.
Not only can creating a map help you spot the places you want to visit but also show you how far one spot is from another. It can help you decide which place to visit first and what place is for the next and so forth. It can help you eliminate some spots or destinations that are too far from the main route, which can make you waste time. Thus, creating a map gives you a rough idea about how many places you can possibly visit, how much time you want to spend in each, and how much time you’ll need to reach each spot from the previous spot considering the very short time you have for the break. Sticking to your plan—time and place based on your map—can make your road trip more effective and efficient.
I always use Google Map for planning my trips. It helps me organize my itinerary better. Like, I can list some places for one date/day. I can list some spots in one city. I can list important places where I have to go back to such as my airbnb/hostel/hotel addresses and see how far to get there from where I get on/off from the airport/bus stop/train station/etc. Google Map is definitely my Bae when it comes to traveling. I think it’s really one of the real useful thing in this era of technology.
2. Download offline map.
Depending on where you are going, it is always safer to have an offline map you can rely on. Not all places have excellent internet connections. Not all places can give you free wifi. And, you might run out of your mobile data. You can save the coordinates of your destinations in your offline map before departure because sometimes the offline map cannot locate the exact coordinates especially when the places are not “common” or popular. Saving your destinations in your offline map while you’re online can help you navigate your road trip much faster and easier and more precisely. Another way is to set your navigation using Google map when you’re online, and one it has located the spot, you can turn off your mobile data but still be able to keep the map page and keep navigating. This way you can save your data quite much.
The “negative” side of this is that the offline map might take some space in your phone. Hence, once you completed a trip, you might want to delete it or clear the cache to free up some space, and you can download it again next time if you need to do another trip. It’s more likely that you’ll visit a new place anyway, while offline map is usually limited to a certain place or region, so once you completed a trip in a certain place, it’s better to uninstall/remove the offline map of that area because when you go to a new/another place, you’ll need to download a new offline map of that area. Hence, keeping your old downloaded offline map is not so wise since it can make your storage full, which is inconvenient in my opinion.
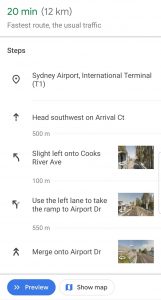
3. Take screenshots.
If it is not possible for you to download an offline map, taking screenshots of the directions to your destinations and saving them on your phone gallery can be really helpful. After you have decided on the itinerary, you can go online and search the directions and take a screenshot of each or more detailed direction. Doing this can help you not only save your internet data but also your battery since it does not require GPS or internet connection. In addition, taking a screenshot is surely more environmentally friendly than printing out all the directions on the paper, right? 😉 But, again, don’t forget to delete them once you’ve completed the trips. Screenshots can take a lot of space on your phone if you don’t clear them regularly 🙁
4. Prepare a “power bank” or a spare battery.
Now that you have set up your map or your screenshots, don’t forget to prepare a power bank or a spare battery. That is because your road trip might be ruined when suddenly your phone is dead for running out of battery, while you still need some directions. But of course, this is optional since you can always charge your device using the USB ports available in your car 😉 But again, it won’t available when you travel by public transportation, so you would really need a power bank or a spare battery to charge your phone, camera, etc. Of course, don’t forget to charge either your phone, camera, or power bank in your hostel/hotel/airbnb/etc. when you find a power outlet.
Now that you have known these tips, are you ready to navigate your ways for a future road trip? You might think it’s a bit complicated for a preparation but, hey, best preparations will lead you to the best journeys 🙂
I will try to share other tips later. I think I’ve got a lot to share but sometimes I end up writing so little, and sometimes I forget, and sometimes I’m just like, “Well, nobody will read it anyway.” But, well, I guess I just want to share so it doesn’t really matter if anyone reads it or not ^^ though deep down, I really hope that few people who happen to read it will find it useful 🙂
Leave a Reply