Hello, I’m back with another cooking-as-I-please post. For my previous posts on this topic, you can read it here. And, not sure if you read it there, but I put a disclaimer under this category that says: This might not be the best instructions you’ll get ’cause basically I cook as I like using whatever I’ve got. So I kinda wish that no professional chefs (or people who’re really into cooking) would read this ’cause I’m afraid they’d consider it blasphemy.
And I really mean it. I mean, if you’re seriously looking for something and do not want to spend too much time reading nonsense and just wish to find the to-the-point-and-straightforward step-by-step instructions as well as ingredients, this post might not be for you. Or if you still want to read it, you can skim and scan so you don’t have to read my endless gibberish. But if you want something that can make you feel better about yourself and make you think, “I thought I was bad at this but definitely someone is worse”, then this post is for you. But either way, I hope you can find this post either useful or entertaining, or who knows both. Well, this time I’ll share a recipe to make simple sushi. But, some people might call this kimbap, Korean version of sushi. From what I read, there are at least two differences between kimbap and sushi. Sushi uses vinegar, while kimbap is sweeter and uses sesame oil. Sushi uses raw fish for the filling, and kimbap uses cooked items like canned tunas and veggies. Sooo, I’m not sure what to call this since I kinda combined the two because, again, I just used what I’ve got. As long as it’s edible, (healthy), and tastes good, why not, right? So don’t hate me, but, the name doesn’t really matter to me. But to be frank, I prefer calling it sushi, because, well, before kimbap is getting popular, sushi has been popular. So for me kimbap is just the Korean version of sushi. But perhaps that’s because I’m biased since I’m more into Japanese stuff. Maybe because I’m a “weeb” 🙈✌
 What you need (or rather, what I’ve got. LoL):
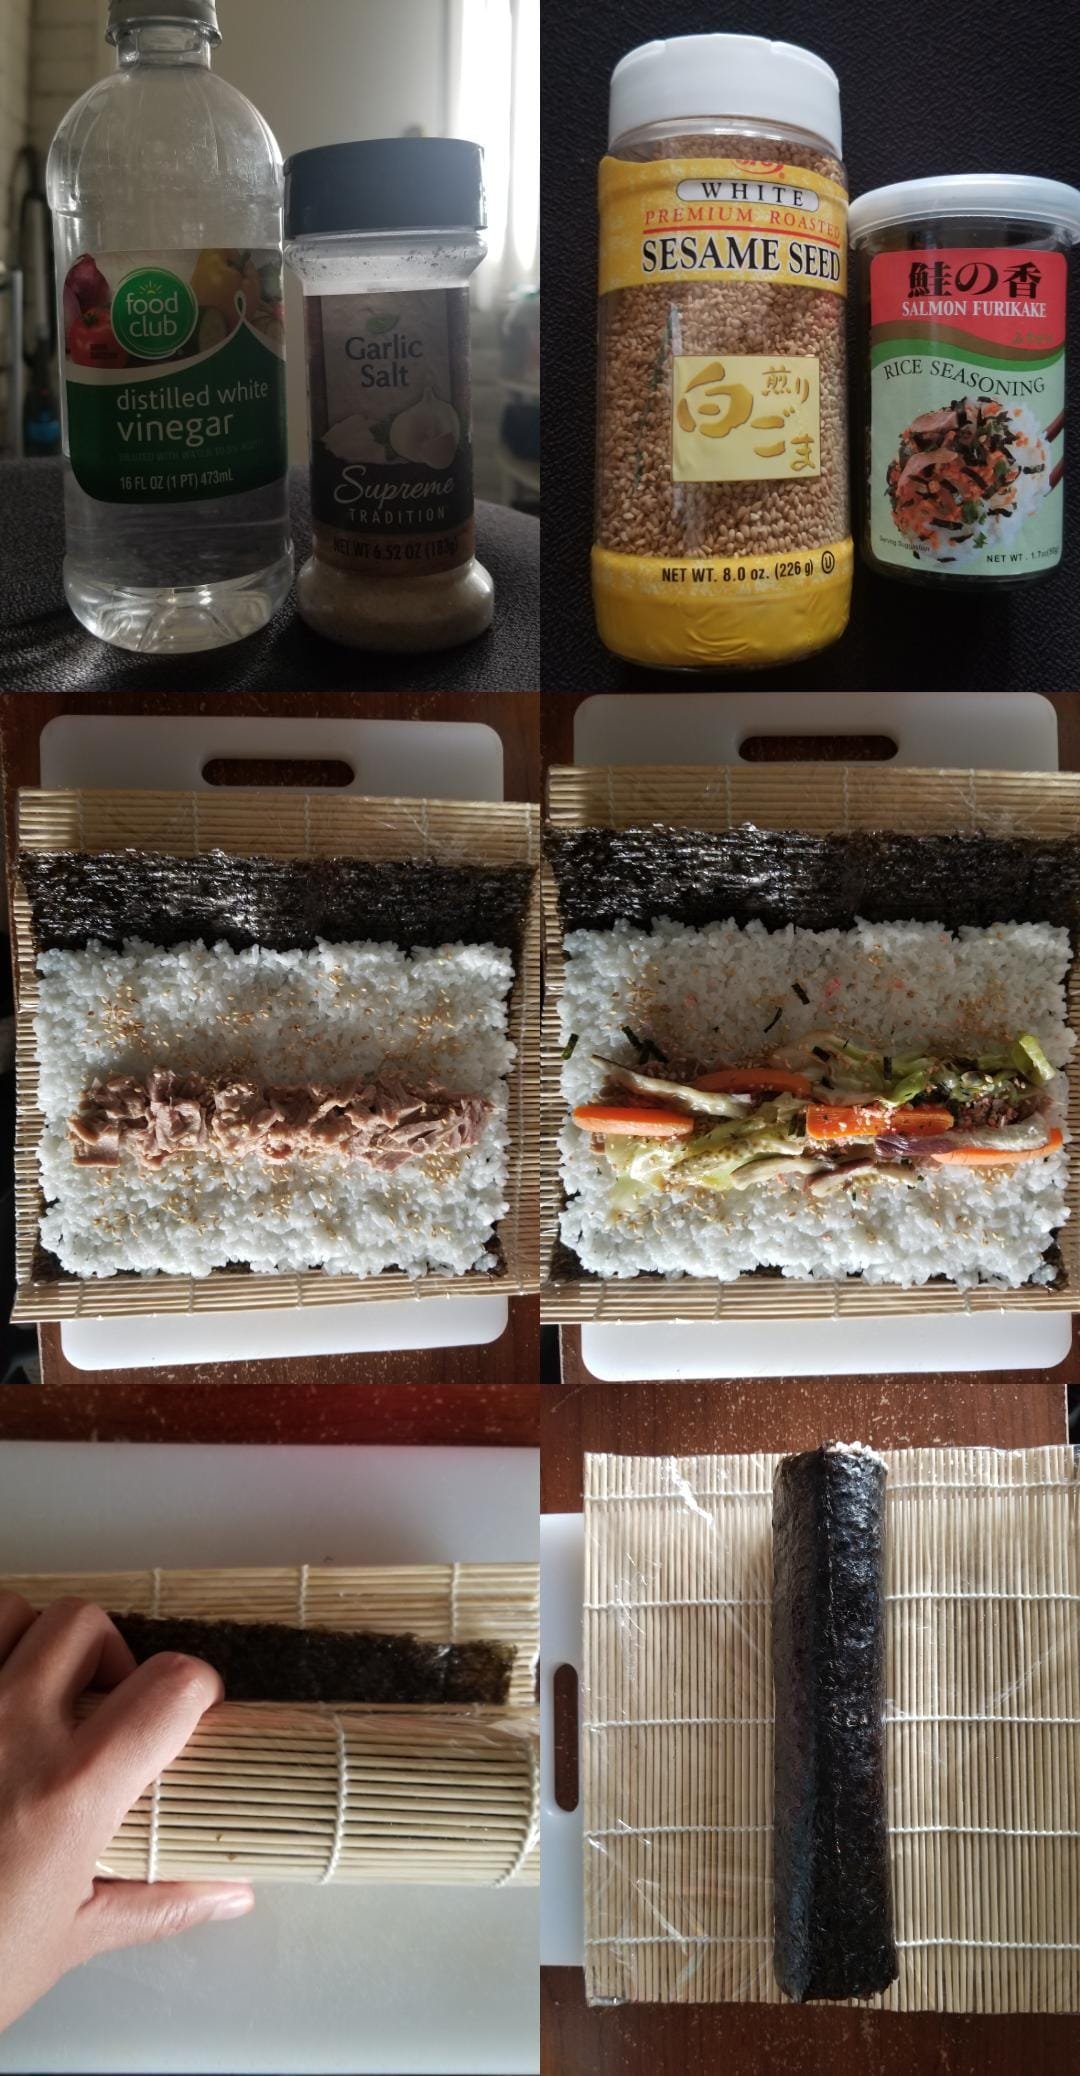
- Tools: Sushi mat, cutting board, sharp knife, big bowl, small bowl, spoon. By the way, I’ve got my bamboo sushi mat for less than USD $1 at eBay, so if you haven’t got one, please do yourself a favor and get one. It’s great. But if you don’t have it, maybe you can use something else with the same function. I don’t know, as long as it’s something that is sturdy but can be bent, then maybe that’s okay.
- Ingredients:
- Freshly cooked rice. Like I wrote in my post about making onigiri, I mean warm/hot rice ’cause again, it’s easier to mix and stick. I read that there is a certain kind of rice that you should use to make sushi, but again, personally, I think any rice would do (except basmati rice, perhaps). Here I use a mix of Jasmine and something that I don’t know what the brand is. It’s given to me by my Indonesian friend when they left the country, so I just use it ’cause that’s what cooking in this category is about: Cooking with what we’ve got.
- Nori sushi. The wide rectangular big one, not the size of nori that we usually eat as snacks. This is a must ’cause that’s what we use to wrap the rice.
- Salt. Again, any kind of salt you’ve got.
- Vinegar. Actually, I wasn’t sure if this is a must, but the YouTube video that I watched says that we need it, so I used it because thankfully I’ve got it (for free from a friend🙈😆).
- Fillings: (Basically what you put in the middle of sushi rice. So actually it’s up to you ’cause again, you can use whatever you want or whatever you’ve got, so feel free to explore your creativity, as for me, this time these were what I’ve got so these are what I used).
- Tuna. Again, like what I wrote in my previous post about making onigiri, I also steamed it along while cooking the rice. And again, basically, you can use anything you like. You can try some cooked chicken, salmon, or something else.
- Carrots. Cut it small but long then steam it too. Again, to save time you can always steam it together with tuna and any other fillings you wish to put into your sushi while cooking the rice. This time I have eggplants, so I steam it as well.
- Sesame seed and furikake. This is optional. I use it just because I have it. (I didn’t even buy the sesame seed ’cause actually another friend left it for me. So yeah…)
- Cabbage. Well, maybe people use different kinds of veggies, and that’s completely fine. But this time I’ve got cabbage and so I used it. Also, you can put the cabbage raw/fresh or as it is, but this time I feel like frying it, so I used fried cabbage. Have you ever eaten fried cabbage? If you haven’t you’re certainly missing out. But good news, now you can try to eat it yourself. Don’t know how to fry cabbage? Well, just heat up a little oil on your pan, medium heat, then fry the cabbage. Done.
 How-to-make steps:
- Cook the rice and steam the tuna and veggies that you plan to use as “fillings”.
- Put some hot/warm rice into a big bowl. Add some salt and vinegar. (I also added a little olive oil and sesame oil, by the way, again just because I’ve got it. LoL) Mix/stir using a spoon. Make sure the salt and vinegar get spread evenly with the whole rice. Also, don’t use too much vinegar ’cause it might be too sour later. Well, I used around 2 tablespoons of vinegar for a big bowl of rice. (The YouTube video that I watched, however, put so much vinegar. My). But, you know, if you’re not sure, you can always experiment. We learn from mistakes and we succeed from failures anyway, so no worries. I mean, by trying to cook repeatedly, and experiment with different amounts of vinegar and such, you’d eventually get some experiences that will teach you the right amount to use. I mean, your guts will start learning things like, “Oh, if I use this amount for this portion, it’s too little, but if I use that amount, it’s too much.” And eventually, you’ll get to estimate the amount more accurately. Well, after all, experiences are the best teachers, no? ^^
- Place nori sushi on top of the sushi mat. The smooth side in the bottom, and the rough side facing up. Also, you might want to wrap your sushi mat with plastic wrap. I wrapped mine with a plastic wrap ’cause I was worried some rice would stick to my sushi mat and I really didn’t want to make it dirty, so I used the plastic wrap because I had it. (Again, I got it from my friend. Gosh, they really left me with some useful stuff 😌🙈🤣)
-
- Put the rice on top of the nori sushi. Don’t forget to leave some space on one end, perhaps around 1-1,5 inches or around two centimeters. (See pic). Some people straightly used their hands to spread and even out the rice on top of the nori sushi. In that case, you might want to provide a little water in a bowl for you to dip your fingers a bit so the rice won’t stick too much onto your fingers. Me? Nah, I used a spoon, of course. I’m a spoon person. 1) I don’t want the rice to stick to my hand. 2) I find it easier to spread and even out the rice as well as to press it onto the nori. And by the way, don’t make the layer of the rice too thick. Make it as thin as you can.
- Put the filling in the middle of the spread rice. See pic. Again, you can put anything you like/want. (But my suggestion is, don’t put something sweet. Not because I’m more of a savory person, though yes I am, but, ugh, this is not a cake). Also, you don’t want to put too much filling because it will be harder to roll and cover later.
- Roll the sushi mat carefully until it covers and reaches the end part of nori that has rice. See pic. Press it until the shape feels firm. Then apply some water/oil (as a glue) onto the part of nori that has no rice, and then glue it to the part of nori that has been rolled with the rice until it is “glued” or forms a complete roll/cylinder. Well, see pic.
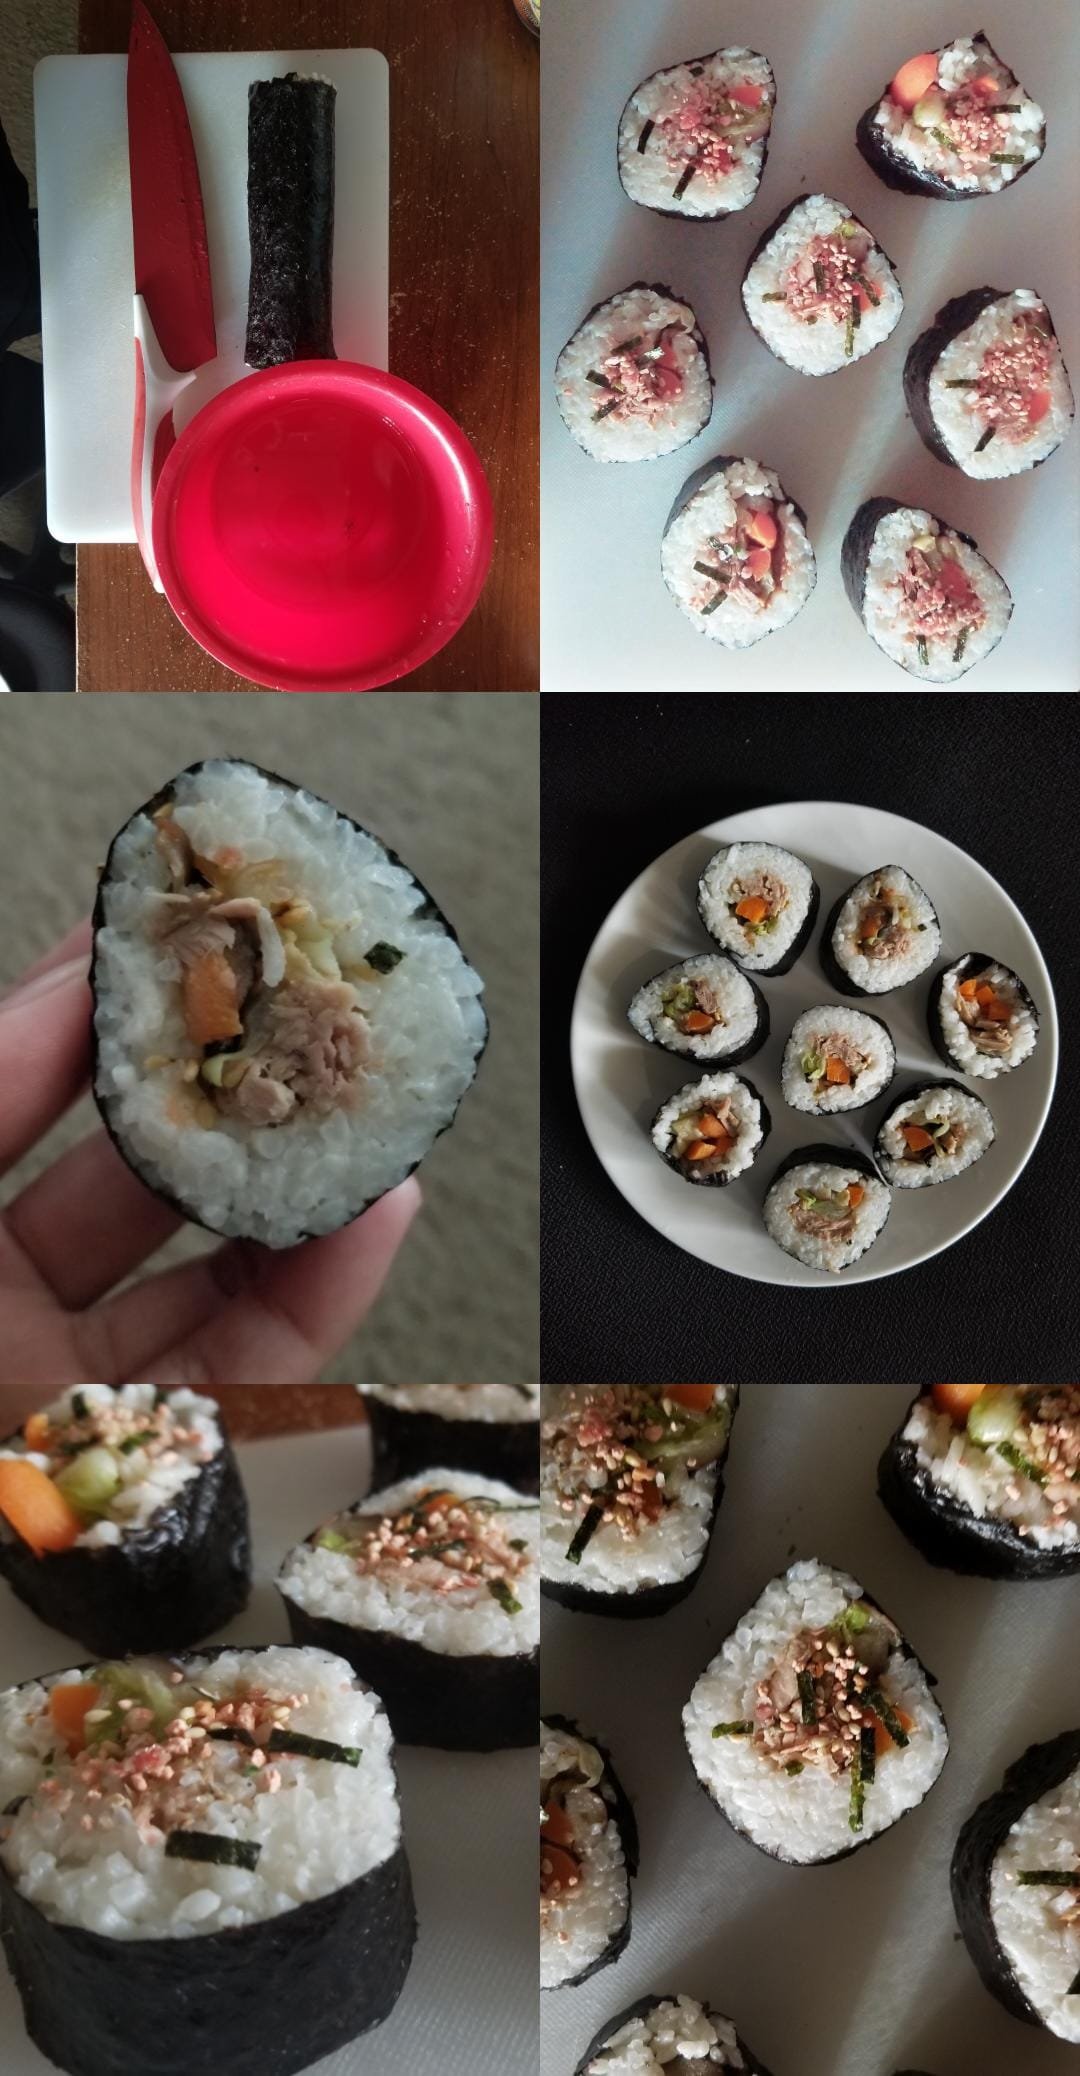
- Cut your sushi with a sharp knife. The thing is, if your knife is dull, it might ruin the shape of sushi as it won’t cut immediately. And you don’t want it. So use a sharp knife. And don’t forget to provide a little water in a small bowl to clean the knife after each cut/slice so the rice won’t stick too much to your knife. If the rice sticks onto your knife and you don’t clean it before making the next cut/slice, the knife won’t be as sharp, and again, it will ruin the sushi and you don’t want it. Also, don’t cut it too thin ’cause it might break. Cut it around two-centimeter long for each sushi.
Arrange your sushi beautifully on a beautiful plate,you can also add more furikake on top of your sushito make it prettier. Don’t forget to take pictures of it, so you can show it off better on your social media platforms.- Your sushi is ready to eat 🙂 (You can eat it with soy sauce, sushi sauce (is there any?) or such, but I just didn’t because I didn’t feel like it).
So, what do you think? Easy? Difficult? Personally, I think it’s quite easy, but perhaps it’s a bit time-consuming. Well, it does take time. But I don’t know when I was making it myself, I didn’t think it was time-consuming. On the contrary, I did enjoy it. Well, I must really not want to do my writing for my dissertation at that time. Haha But, well, surprisingly, it tasted good 😉
And, oh, seeing how time-consuming cooking is, I really have to say something: Please appreciate the food your Mom/Dad/Brother/Sister/Wife/Husband/etc. makes for you. They spend their time trying to provide good food for you, and you know how precious time is. Time is precious because you will never never never able to able to get it back no matter how much you try. So please appreciate their efforts, otherwise, I’ll hate you.
Well, okay, sorry for preaching in a cooking post, but oh well, I will see if I can share another recipe with you. So stay tuned 😉